

Hello everyone. I recently replaced both the ball joints on my 99 OBW. One had been replaced before, the other appeared original. With 172,000 New England miles I knew that side would give me trouble so I researched as many tips from any forum I could. I found a puller on line that no longer appears to be available so I set out to make my own. I thought I would share my creation with everyone. In the pictures you may notice two different pullers, the first one I made is what I used with great success, however it required special tools and parts to build. I designed a second one that was easier to build with off the shelf parts and common tool so it could be built easier.
Parts List
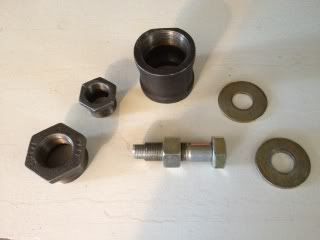
1ea Black Iron 1 1/2” pipe coupling
1ea Black Iron 1 ½ “ to 1” bushing
1ea Black Iron 1” to 3/4” bushing
1ea 3/4”x 3” grade 8 bolt and nut (fine threads are better but coarse will work)
2ea 3/4” heavy fender washer
![Image]()
Tools
files
drill press
bench grinder
drill bits up to 27/64”
12m x 1.25 tap
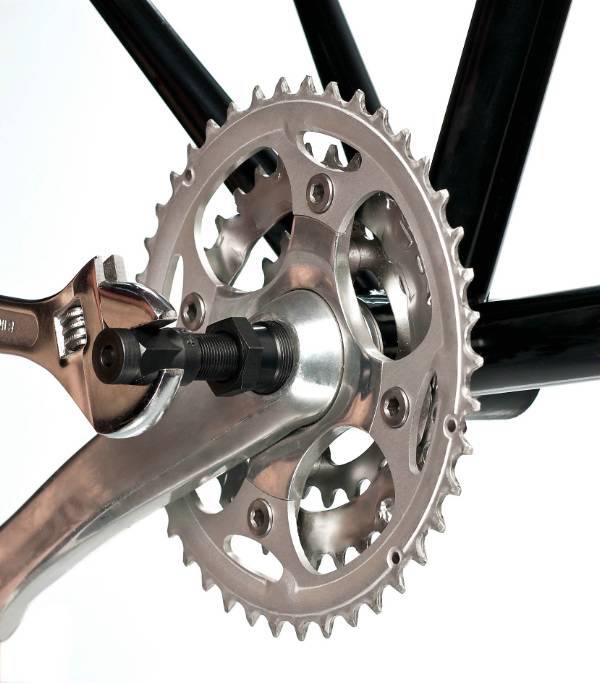
First screw together the coupling and two bushings, just snug them up and you’ll get the body of the puller.
![Image]()
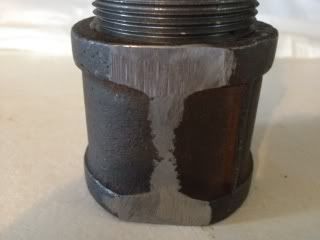
Now go to the grinder and flatten off the lip so it can clear the dust shield and the ball joint wont hang up on the edge. If your dust shields are removed skip this part.
![Image]()
While your at the grinder put a flat on opposite sides of the threaded end of your 3/4” bolt like this.
![Image]()
carefully remove metal until a 9/16” wrench fits snugly on the end. I got it close and the evened out the flats with a hand file until the wrench fit nicely.
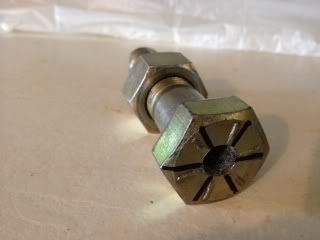
Next find center of the bolt head by marking across the head from point to point and center punching the middle. Set the bolt up in a drill press ( a vice and hand drill could work ) and start with a 3/16” pilot hole about 1” deep.
![Image]()
Open the hole with progressively larger bits until you reach 27/64”. Lastly use the 12m x 1.25 tap to cut the threads in the 27/64” hole. Congratulations you are done building the puller.
![Image]()
note: I removed the bolt head but later realized it was unnecessary so I eliminated the step from the instructions.
Tip: The tap will be difficult to start square so before removing the bolt from the drill press, put the tap in the chuck lower it into the hole and turn the chuck by hand cutting the first 2 or 3 threads. Then remove the bolt and tap and hand tap the rest normally. CAUTION Do not turn on the drill press you will destroy your piece, snap the tap, and probably injure yourself. And for crying out loud wear safety glasses for this part.:gasp:
Using your home made ball joint puller.
Put vice grips on shaft of ball joint and screw on the threaded portion of the puller. Then remove vise grips.
![Image]()
slide the base and two washers onto the shaft and secure with the nut.
![Image]()
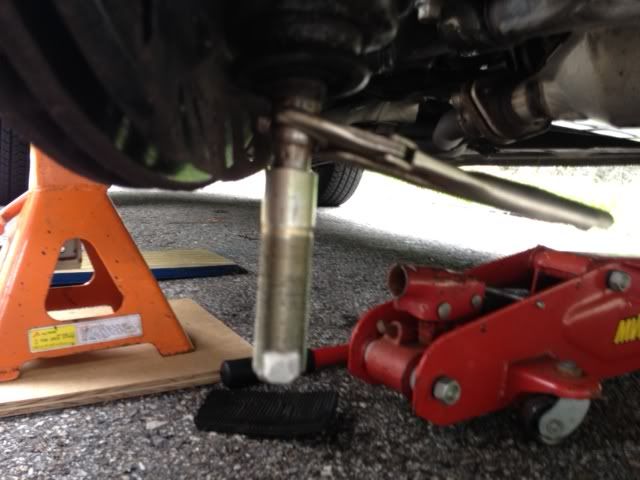
make sure the tool is sitting flush on the bottom of the knuckle and tighten down the nut.
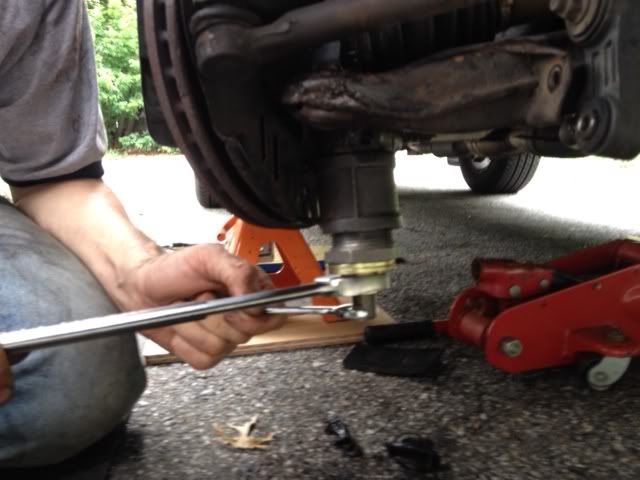
Hold the shaft with the 9/16” wrench and use a 1 1/8” wrench, pipe wrench or whatever you have to slowly start cranking down the large nut.
![Image]()
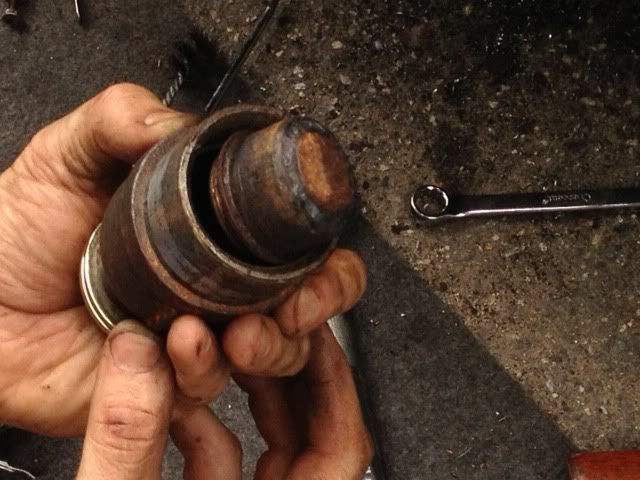
When I did it It got real hard, made a cracking sound and then started pulling right out. Victory!!
![Image]()
All told once at the pulling stage it was probably 10 – 20 min. to remove the joint and that includes all the picture taking my wonderfull wife did so I wouldn’t get her i phone greasy. Well that’s it, hope this helps someone out there. Good luck with it. Reddrexx
Parts List
1ea Black Iron 1 1/2” pipe coupling
1ea Black Iron 1 ½ “ to 1” bushing
1ea Black Iron 1” to 3/4” bushing
1ea 3/4”x 3” grade 8 bolt and nut (fine threads are better but coarse will work)
2ea 3/4” heavy fender washer
Tools
files
drill press
bench grinder
drill bits up to 27/64”
12m x 1.25 tap
First screw together the coupling and two bushings, just snug them up and you’ll get the body of the puller.

Now go to the grinder and flatten off the lip so it can clear the dust shield and the ball joint wont hang up on the edge. If your dust shields are removed skip this part.
While your at the grinder put a flat on opposite sides of the threaded end of your 3/4” bolt like this.

carefully remove metal until a 9/16” wrench fits snugly on the end. I got it close and the evened out the flats with a hand file until the wrench fit nicely.
Next find center of the bolt head by marking across the head from point to point and center punching the middle. Set the bolt up in a drill press ( a vice and hand drill could work ) and start with a 3/16” pilot hole about 1” deep.
Open the hole with progressively larger bits until you reach 27/64”. Lastly use the 12m x 1.25 tap to cut the threads in the 27/64” hole. Congratulations you are done building the puller.

note: I removed the bolt head but later realized it was unnecessary so I eliminated the step from the instructions.
Tip: The tap will be difficult to start square so before removing the bolt from the drill press, put the tap in the chuck lower it into the hole and turn the chuck by hand cutting the first 2 or 3 threads. Then remove the bolt and tap and hand tap the rest normally. CAUTION Do not turn on the drill press you will destroy your piece, snap the tap, and probably injure yourself. And for crying out loud wear safety glasses for this part.:gasp:
Using your home made ball joint puller.
Put vice grips on shaft of ball joint and screw on the threaded portion of the puller. Then remove vise grips.
slide the base and two washers onto the shaft and secure with the nut.

make sure the tool is sitting flush on the bottom of the knuckle and tighten down the nut.
Hold the shaft with the 9/16” wrench and use a 1 1/8” wrench, pipe wrench or whatever you have to slowly start cranking down the large nut.
When I did it It got real hard, made a cracking sound and then started pulling right out. Victory!!
All told once at the pulling stage it was probably 10 – 20 min. to remove the joint and that includes all the picture taking my wonderfull wife did so I wouldn’t get her i phone greasy. Well that’s it, hope this helps someone out there. Good luck with it. Reddrexx
")


sE9swm(temBRT,6Gv5Ew~~60_57.JPG)


