Subaru Outback Forums banner

At my wits end with separating motor from transmission.

7.7K views 21 replies 7 participants last post by  cardoc  
#1 ·
Been two days trying to get the motor out to do a head gasket replacement. At this point I'm cold, tired, and ready to be done with it. I may just call a tow truck and just buy a car tomorrow. As you can see from the pics I do have it separated in spots but the top passenger side is still very much together. I have these heads ready to go in that got resurfaced, cleaned & blasted, valve job with new cam and valve seals that cost me $750. If I knew it was going to be this difficult I would have just sold it as is.
 

Attachments

#5 ·
Do you have the engine lifted enough to clear the engine mounts? If so maybe the gearbox snout is stuck in the bearing in the flywheel.

Seagrass
 
#6 ·
If you have all of the bell housing bolts out, and you have the engine mounts and transmission mounts disconnected, and the engine lifted up slightly then it may be that the lower transmission to engine stud bolts are what's holding you up.

You have to get the engine sitting at the same angle as the transmission so those studs will slide straight out.

There shouldn't really be anything with the input shaft or clutch assembly that's holding it in unless there's a problem with the release bearing to pressure plate.

Hope you got a new clutch kit for putting it back together just in case your current one is worn.
 
#7 ·
This: "You have to get the engine sitting at the same angle as the transmission so those studs will slide straight out. "

Do you have a load leveler on the engine hoist and the transmission jacked up slightly at the front? You have to match the angle of the two, and then pry a little around each side.I bet if you either jack up the front of the transmission or drop the engine a bit and get the gap even all around it will slide right out!
 
#10 ·
No motor mount studs on the bottom that I'm aware of. So maybe I'll move the jackstand closer to the engine if see if that helps. What are you guys talking about leveling? Are you referring to side to side level eg. drivers side and pass side level with each other? Both bottom studs are almost all the way out also. Had to return the rental engine hoist - going to try again tomorrow.
 
#14 ·
Trying this but there's two bolts on very tight and I'm worried about stripping them. Probably because of the separation I currently have. I can't get a good bite on them even through the starter hole. I heard a loud popping or thunk noise early when I was lifting on the engine with hoist. That's why I'm trying to pull the pressure plate.
 
#15 · (Edited)
Fluff, push the cases back together, and try accessing it from underneath thru that inspection cover. There is also an access on the right side behind the intake manifold, under a rubber cover. (at least there used to be; I've never looked that close on one if the newer EJ25s). You might have to undo the intake manifold and slide it forward a couple of inches to be able to use that one.
Honestly, assuming there isn't anything mechanical like a motor mount or frame structure in the way, the clutch is all there is left that might be holding them together.
Well, there is one more possibility . . . some of the older models used a "pull" clutch, where the release fork engaged the throwout bearing/pressure plate, and moved it towards the rear of the car to release. Those, you had to pull a long "pivot" bolt from the bellhousing, and lift out the release fork. (IIRC; was a long time ago.)
I've only seen one like this, and it was in a '91 (?) EJ22 turbo in a Legacy sedan, but that doesn't mean it wasn't used elsewhere. Maybe somebody here knows? Did the clutch slave cylinder push forward, or backwards? If forward, it is probably a "pull" clutch. If you see what might be a long bolt thru the bellhousing in the vicinity of the release fork, try removing it and lifting out the release fork. Either way, once you undo the pressure plate, the clutch will separate, and so will the engine assuming that is the problem.
 
#16 ·
some of the older models used a "pull" clutch,
Now that's interesting. I had that in mind way back but figured it wasn't applicable. That's because I remembered how stuck you could get when pulling one of these. We removed the external shaft lever and guided the fork over the bearing as we pulled the trans back. Most of the time we couldn't safely pull the engine and leave the trans in, so trans came out whether or not it was a trans or engine swap.

Image
 
#18 ·
I'm done with it at this point. I can't keep renting lifts, heaters, and tools. I'll call a tow truck tomorrow and see if a mechanic or junk yard wants it. I have these awesome looking heads I was looking forward to installing. Does anyone want them? It was a good car before it decided to blow off a radiator hose and overheat. Got 10 good years out of it so I can't complain.
 

Attachments

#19 ·
Boot? Bottom cover was a vented metal piece with two 6mm screws on older engines. The upper one was just a rubber cover. Whatever.
The pressure plate used to be mounted with a ring of 6 8mm bolts (12mm hex head) around the perimeter, inserted back to front, and threaded into the flywheel. Torque something like 20 ftlb.
Your car is newer, but I'd be surprised if that was very much different. If you don't have one, you might look around to see if you cant find the service manual in .pdf. Generally a free download, but you might have to circumnavigate some phishing schemes to get to it these days.
Lemme look . . . Here is a document showing the clutch assembly from an '09 Forester. It is a standard push release, 6 bolt pressure plate. Yours might still be different, but that's as close as I have on my computer.
I'm used to working with the car on a hoist, and I'm pretty sure when I had the binding problem, I removed the pressure plate hardware from underneath. I don't recall it being an issue. Again, that was a decade ago; maybe longer.
 

Attachments

#20 ·
Pull clutch was last used in 06.

This car is the same type setup as previous push model 5 speeds. In the pics you can see the fork orientation.

There is a lower cover plate in the bottom of the engine that tends to grab a torque converter when pulling an engine, but I've never had an issue with a manual.

Thinking there's a bolt still in the bell housing.

There are six bolts that come out. And then there's the two nuts and washers on the lower stud bolts.

The only other thing I could think of is that that front mount is not letting the engine move. It needs to be removed completely so it doesn't snag on the bracket on the frame.

All the pictures of a gap between the engine and transmission are from the driver side view. Is the other side getting a gap the same way?
 
#21 · (Edited)
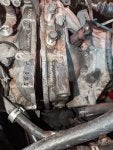
What The Doc sez ↑↑↑; first and foremost you have to make absolutely sure all of the fasteners are out. Then you sometimes will have to pry a little to get the two dowel pins out. Fotos looks like that part is done, but double check. And finally, you have to be sure you aren't physically in contact with something in the engine compartment that is keeping you from moving the engine forward. There just ain't anything else. Except the clutch attached to the engine/flywheel, and the transmission input shaft, keyed to the splines of the clutch friction plate. This is supposed to be a sliding engagement, but sometimes it don' slide so good.
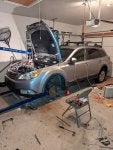
Fluff, don't throw in the towel; you are almost there. Check to be sure the engine is hanging free from your shop crane, and if it is, slide underneath with 10mm and 12mm combo wrenches, pull the cover plate, and remove all six pressure plate bolts. Once they are all out, you should be able to spin the tranny by hand (no longer engaging the engine via the clutch).
Man, if it doesn't come apart then, you need an exorcist or something :-D.
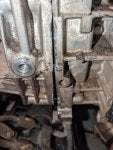
(Edit) And it seems like I saw this mentioned above, but once again: Use your floor jack, and a chunk of 2X4 to gently lift the front of the transmission, and lower the engine a bit until the gap between the cases is more or less even all of the way around. In your instance, gently pull them together with one of the bolts if necessary. Then start at the top center, where you are currently having issues, and use something like a wood chisel with a light hammer and tap it into the gap between the cases there. If it still doesn't move . . . Some Dynamite maybe?