When I changed my head gaskets in car, I managed to break the seal on the two lines connected to my A/C compressor. It took about 3 days to discharge. This turned out to be a blessing in disguise.
1. I've never charged an ac system from complete discharge
2. never changed seals in ac system.
3. I did not have one of these vacuum pump tools.
I learned a few hints someone may find useful one day. Shadetree method.
1. when changing A/C o'rings, mineral oil is the cheapest and easiest to find lubricant to use on the seals. Always lube your o'rings or they will roll and leak.
2. Change one seal at a time, (if possible), to avoid contaminants in the a/c system.
3. Clean the heck out of the fitting BEFORE removing the bolt/keeper. Also clean the area above the seal so you don't brush trash into the system. DO NOT use compressed air, you could force trash or water into a leaking seal.
4. check your hole before inserting the new o'ring, if you see any foreign objects in there, dab them out using a clean lint-free rag.
5. careful not to get your O-rings dirty, if you do, clean them with mineral oil and a lint-free rag.
I was lucky enough to have a set of gauges and my neighbor loaned me his sweet, antique, brick of a vacuum pump. I ran the vacuum on the High Side and the Low Side at the same time. I let the pump run for an hour and a half. This will help pull out any moisture, the negative pressure will vaporize the moisture and draw it into the pump. The longer the system stays discharged the more chance it has to build up moisture. I was told nitrogen is used to flush out the system if you feel you need it. I'm cheap and it was only dead for two to three very hot days, so I didn't need it, I think. I'm new here too.
After the 1.5 hours, I closed the valves on the gauges and let it sit for 3 hours. The system held perfectly steady the whole time. You can let it hold vacuum for a little as 15-30 mins to check for leaks. Once again, I'm cheap and did not want to buy another charge of Freon, so I wanted to make sure.
Don't remove either of the vacuum guage lines from your a/c system. Because the connector is a one way valve, with a vacuum on it, the valve will not close and suck dirty fart air into the system.
I then hooked up a can of Freon to my gauges and attempted to fill it. This did not work because my gauges are garbage. After wasting the can of Freon and freezing off my favorite finger. I got out the two cans of Freon I picked up which contain oil/stop leak/ and their own re-charge lines. I pulled the low pressure side fitting off then quickly attached the can and started charging it up. Not really another choice ATM
WEAR SOME DECENT LEATHER GLOVES - these fill your own kits always leak Freon and you have to hold your finger on it for it to spray out. At least I have never used one that didn't leak.
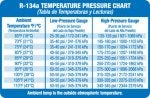
Recharge with the car running and refer to the chart below to figure out how much you should charge your A/C system. Note the pressure changes with the outside temperature.
After re-charging my system did not seem to work that great. I pulled the glove box out and found that I do not have a cabin air filter where one should be and dirt caked all over my coil. I got a can of Foaming A/C Coil cleaner, you have to get the kind that is safe to use indoors. I got the one orange scented one. Also, while your at it, cover the condenser at the front of the car.
My air compressor would also not work unless the engine was revved up. I removed one of the smallest shims. My clutch contained two very skinny shims and one regular washer sized one.
(All Years) How to: Adjust A/C Compressor Clutch - Subaru Forester Owners Forum
Now haul ass to work, because you lost track of time and are almost late. Then put a write up on the Subaru forum site in your down time.
1. I've never charged an ac system from complete discharge
2. never changed seals in ac system.
3. I did not have one of these vacuum pump tools.
I learned a few hints someone may find useful one day. Shadetree method.
1. when changing A/C o'rings, mineral oil is the cheapest and easiest to find lubricant to use on the seals. Always lube your o'rings or they will roll and leak.
2. Change one seal at a time, (if possible), to avoid contaminants in the a/c system.
3. Clean the heck out of the fitting BEFORE removing the bolt/keeper. Also clean the area above the seal so you don't brush trash into the system. DO NOT use compressed air, you could force trash or water into a leaking seal.
4. check your hole before inserting the new o'ring, if you see any foreign objects in there, dab them out using a clean lint-free rag.
5. careful not to get your O-rings dirty, if you do, clean them with mineral oil and a lint-free rag.
I was lucky enough to have a set of gauges and my neighbor loaned me his sweet, antique, brick of a vacuum pump. I ran the vacuum on the High Side and the Low Side at the same time. I let the pump run for an hour and a half. This will help pull out any moisture, the negative pressure will vaporize the moisture and draw it into the pump. The longer the system stays discharged the more chance it has to build up moisture. I was told nitrogen is used to flush out the system if you feel you need it. I'm cheap and it was only dead for two to three very hot days, so I didn't need it, I think. I'm new here too.
After the 1.5 hours, I closed the valves on the gauges and let it sit for 3 hours. The system held perfectly steady the whole time. You can let it hold vacuum for a little as 15-30 mins to check for leaks. Once again, I'm cheap and did not want to buy another charge of Freon, so I wanted to make sure.
Don't remove either of the vacuum guage lines from your a/c system. Because the connector is a one way valve, with a vacuum on it, the valve will not close and suck dirty fart air into the system.
I then hooked up a can of Freon to my gauges and attempted to fill it. This did not work because my gauges are garbage. After wasting the can of Freon and freezing off my favorite finger. I got out the two cans of Freon I picked up which contain oil/stop leak/ and their own re-charge lines. I pulled the low pressure side fitting off then quickly attached the can and started charging it up. Not really another choice ATM
WEAR SOME DECENT LEATHER GLOVES - these fill your own kits always leak Freon and you have to hold your finger on it for it to spray out. At least I have never used one that didn't leak.
Recharge with the car running and refer to the chart below to figure out how much you should charge your A/C system. Note the pressure changes with the outside temperature.
After re-charging my system did not seem to work that great. I pulled the glove box out and found that I do not have a cabin air filter where one should be and dirt caked all over my coil. I got a can of Foaming A/C Coil cleaner, you have to get the kind that is safe to use indoors. I got the one orange scented one. Also, while your at it, cover the condenser at the front of the car.
My air compressor would also not work unless the engine was revved up. I removed one of the smallest shims. My clutch contained two very skinny shims and one regular washer sized one.
(All Years) How to: Adjust A/C Compressor Clutch - Subaru Forester Owners Forum
Now haul ass to work, because you lost track of time and are almost late. Then put a write up on the Subaru forum site in your down time.