Go to Mr. Subaru YouTube:
The best advice I can give you is to buy the Ko-Kem thin walled Sparkplug socket .
This is the 14mm used for 2.5L. The 6 boxer uses a 16mm socket. Believe me when I say it’s worth the money. I’m old and the job took me 3 hrs - 1 hr on left side….2 hrs for right side. This boxer motor has very tight clearances….and the Right Rear #4 for 2.5L was a royal PITA to get out and harder to install cap. I was fiddling around with the cap and thin wiring until Presto! stumbled upon just the only way to rotate the sparkplug cap & insert boot.
I used both 3/8” and 1/4” ratchets & extensions of several short lengths (1/2” and 1”) along with flex & wobble sockets.
FWIW the sparkplugs looked great at 80k. I used factory OEM and ordered from Rock Auto the specified NGK. And seeing how hard it was….I’m going another 80k for next replacement. By then I’ll be too old to do this 😀!
Some Hints: Dielectric grease & AntiSeize.
1) the Sparkplug boot was almost impossible to pull out - I was afraid that the boot would be damaged. When I reinstalled the Sparkplug boot, I used a Q-tip to apply a very thin coating of Dielectric grease in boot to help next scheduled Sparkplup replacement (@ 160k).
2) Anti-seize on Sparkplug threads - this “Tip” is controversial but I’ve worked on Motorcycles and cars for many years.
I used a very light coat of anti seize by using clean toothbrush to “paint” (very THIN coat) all but last 4 threads closest to Sparkplug firing tip). That makes it easier to thread in carefully with “feel”. I use my 50 yrs experience to tighten by “feel”. You have to carefully tighten….feel wrench bottom …a 1/4th extra turn to seat / compress Sparkplug washer.
Take your time. It’s a hard job but with patience it’s doable. Do not rush! I’ve done this on daughter in law’s 2014 Forester with 2.5L several years ago. It wasn’t that hard … maybe I was younger then? 🤪
I do not recommend this for Inexperienced home mechanics. It also helps to be young - I’ve got some arthritis. Good luck 👍!


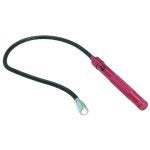
 ...I definitely needed the 14mm flex-head ratcheting box end wrench. Ended up needing to make it longer by duct-taping a long screwdriver to the side of it. The other tip that helped was using a flexible head magnet (see attached photo). That totally saved me when I dropped a couple of bolts down into the abyss... also one of the small metal clips that goes onto the ignition coil. Would have been a major PITA to take off the plastic protector under the car to find it, but instead, all I had to do was go fishing with my flexible head magnet and move it around under the engine and it picked up those bolts and metal clips immediately. Also, having done my 2012 2.5 OB 60K miles ago, when it was at 100K miles, looks like it's time to do it again. After the major PITA that the 2016 OB was, I can't wait to do it on the 2012 again, it was sooooo much easier.