Subaru Outback Forums banner

Lower coolant pipes rusting badly

39K views 29 replies 15 participants last post by  bcallananvt  
#1 ·
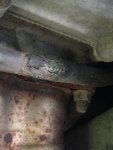
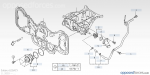
I have an 05 OB LLB 3.0. It has 144, miles on it. I went to change the coolant and luckily decided to drop the lower plastic cover so that I could also replace the thermostat and lower rad hose.Its a good thing I did. I immediately saw that the metal coolant pipes are so rusted that they are about to burst. The pipe on the drivers side looks very difficult to replace.
The other pipe that runs across the bottom front of the engine is easy to change out. Does anyone here know about this issue and has anybody replaced the difficult one that runs up to the back of the engine where it tees off to the heater hoses? Advice on this project or a tutorial on it would be great. thanks
 
#2 ·
Mine likely has the same rusty bulge per se as yours, just below #4 spark plug. It's big and nasty looking. I've sprayed mine with oil to keep it from progressing any further.

It's only "on my list" of things to do. And when I fix it I'll be using a ratcheting tube cutter to cut that piece out and slip a piece of rubber coolant line on to replace the piece I removed, and clamp it at both ends.
 
  • Like
Reactions: Evil.Dingo
#4 ·
Bad news - you have to lift the engine to do it.
Good news - it may only require removing 1 or 3 nuts to do that.

*** While you're doing this - replace the valve cover gaskets, spark plug tube gaskets, and spark plugs at the same time. They are much easier with the engine being lifted so might as well do it now since plugs need replaced at some point, valve covers usually leak on these, and they're cheap.

1. There's two 14mm engine mount nuts under the crossmember - you may be able to gain enough room just by removing the drivers side one and that's it, push the engine up a couple inches for more drivers side access.

2. You may have to remove both lower engine mount nuts - 2 14mm nuts.

3. There's a pitch stopper between the top of transmission and front cowl/vehicle body. Unbolt that.

4. Lift engine

So by removing only 3 nuts - you can lift the engine very easily.

I'm unsure that will give you enough room though. If more room is needed, you can free the engine up to move a little more by:

1. drop the exhaust manifold (not always fun if rusty)

2. remove the transmission mount bolts so the entire engine/trans assembly can "tilt back" so to speak.
 
#6 ·
So by removing only 3 nuts - you can lift the engine very easily.

I'm unsure that will give you enough room though. If more room is needed, you can free the engine up to move a little more by:

1. drop the exhaust manifold (not always fun if rusty)

....
If his coolant line is as rusty as he says and as rusty as I figure, his manifold bolts are likely just as rusty as mine are. All but one came out easy. The one that didn't broke off in the block, using a 18" breaker bar. Welded not one, but 14 nuts to it, head glowing and all, broke off every welded nut and the stud got shorter and shorter. 1/4" still sticking out though. One day it might come out. I have a teeny exhaust leak now that's easier to deal with than taking the chance of having to remove the head to fix a mistake.
 
#5 ·
I did these lines on my '03, don't know how much of the job is applicable.
I didn't have to undo the engine mounts but did lift the engine a skosh, and the rear block mounting bolt I reached through the wheel well.

My steel coolant lines under the intake look crappy too, and oh man what the heck am I gonna do when the steel nipples near the thermostat cover let go?

Those I have been painting with rust converter...

My oil pan rusted through too.

Dave
 
#8 ·
My 2005 Baja does not seem to have this problem.

I live in Vermont where they use copious amounts of chloride on the roads in the winter. I also use copious amounts of water to rinse the salt from the radiator and under the hood EVERY spring. (And the undercarrage)

It is common knowledge that if the saltwater is allowed to dry on the metal surfaces, it will "come to life" during the humid summer months and eat at the metal.
 
#10 ·
Update on rusty coolant pipes

Grossgary was pretty close on this one. All I had to do was get all three hoses off the pipe. Then remove the 2 easy to get to lower bolts and then the hard one meaning the upper bolt between the fat and thin tubes where the heater hose connects. Next only had to remove the nut on the lower motor mount drivers side and jack up the engine on that side until the exhaust touches the sub-frame. At that point, you can carefully wiggle it out but be very mindful about the path it took to get out because you have to put in the new pipe the exact way. It was easier than I thought but you would not want to attempt it without the car being on a lift.
 
#11 ·
I'm going to be changing my motor mounts and taking my exhaust down for a couple other issues I have. Think I'm going to do this at the same time, being that the engine will be lifted up a bit anyway.

Was the part number for that 14165AA021?
 
#13 ·
Does part #11 in this diagram look like what you bought? Less #7 and #8, which is the short coupling hose and clamps. That was all I could find a PN for, was the combined hose, pipe, and clamps.
 

Attachments

#15 ·
I just did this job on my 08 H6 LL Bean OBW. I wanted to add a couple of tips to Grossgary and Flukey's excellent tips.

The exact part# of the line that runs under the exhaust manifold is very model specific. Don't trust the part numbers posted here unless the poster has exact car you have. Use a Subaru specific parts finder that verifies fit according to your exact vehicle (VIN may be required).

I removed the two engine mount bolts only. This allowed me to raise the engine about an inch. When I threaded the new pipe under the exhaust header, it kept catching under some other lines running along the inside of the wheel well. Those lines are clamped to the wheel well/unibody in three places. One near the strut tower, one just in front of the battery and one just behind the radiator. Removing the bolts from the clamps allowed me to move those lines out of the way enough to manipulate the new coolant line into place.

There is also a wiring harness that is clipped to metal stanchion on the inside of the wheel well. Unclipping it gives you some more working room to get your hands into the space where the heater hoses attach to the metal pipe.

For the line that runs along the bottom of the radiator to the oil cooler, there is a big size mismatch between the outlet of the thermostat housing and the inlet of the oil cooler. I haven't seen anyone else address how to handle that size mismatch. I used 1/2 heater hose to attach to the oil cooler end, and then used a 1/2 x 3/4 reducer fitting to attach the 1/2" heater hose to the rubber elbow coming out of the thermostat housing.

Hope this info makes this job a bit easer for someone else.

Adam
 
#25 ·
I'm wondering about alternatives to spending $140 on less than 2 feet of pipe that'll just start rusting again... so, I'd love to work on making a list of the ID of each hose fitting in the coolant system! Perhaps to replace with DIY pipe solutions, perhaps to just run straight hoses. If no one's got sizes, I'll just measure and report back when I do. Actually, I might just buy a few feet each of 3/8, 1/2, 5/8, 3/4, 7/8, 1", and figure I'm prepared for anything...

For the line that runs along the bottom of the radiator to the oil cooler, there is a big size mismatch between the outlet of the thermostat housing and the inlet of the oil cooler. I haven't seen anyone else address how to handle that size mismatch. I used 1/2 heater hose to attach to the oil cooler end, and then used a 1/2 x 3/4 reducer fitting to attach the 1/2" heater hose to the rubber elbow coming out of the thermostat housing.
So far, I see @adamc mention they replaced the oil cooler cross-pipe with a hose and reducer. if I understand right, then that means:
  • Oil cooler from thermostat: 1/2"
  • Thermostat to oil cooler: 3/4"
  • Anyone know the oil-cooler-back-to-block hose size?

Anyone know hose ID for the following hoses, and if they change end-to-end (why do the engineers do that?!)
  • Thermostat to side-pipe
  • Side pipe to heater core
  • Side pipe to throttle body
  • Upper crossover pipe (head/head) to heater core

And, the reasons I can think of to not replace these with just lengths of hose would be (1) heat resistance espc near the exhaust, and (2) impact/debris resistance, espc for the front crossover.
Anything else I might be missing?

Also, just curious, what's the direction of flow for all these? Are the oil cooler crossover and driver's-side-pipe going IN or OUT at the thermostat? When the thermostat opens, does it allow flow to or from the bottom hose of the radiator?
 
#16 ·
Add me to the list of H6 owners with this badly rusted coolant pipe. In the course of front suspension work I had the undershield & wheel well shields removed, which let me see several large scabs of rust on the pipe, with severe deep rusting & flaking close to the rear-most exhaust port. It was just a matter of time till it would leak.

I had the axles out for a preventative rebooting, so that helped with access & clearance. I was able to undo the single mount-to-subframe nut from below & jack the engine up a couple inches, just till the exhaust collector was touching the frame. It was very tricky to position a wrench on the mount nut with the exhaust in place. There is a thick washer under that nut, so watch for it to fall & remember to put it back.

There's little room to work near the upper end of the pipe. You need to get in there to separate 2 hoses (1 to throttle body, 1 to heater) & to remove its bolt. I ended up removing the other heater hose to gain access, so mark them to ensure you don't switch them.

I removed the battery & the black metal cover over the fuel injectors for more maneuvering room. I finagled the old pipe & removed it from above. The new one went in similarly.

At least for gen3 H6 owners in the salt belt, if not everywhere, it seems that this pipe should be routinely inspected. There's a similar looking pipe on gen2 H6 models that may present the same issue. It doesn't look like H4 cars have this pipe & it does look like the 3.6 H6 has a similar pipe.

There's a 2nd coolant pipe heading from the thermostat area over to the oil cooler assembly, that may also have some rust. I chose to replace mine while I had easy access. This pipe is shorter & less bendy but for some reason costs double the other pipe.
 
#17 ·
Rusty coolant pipes - Preventative Measure Idea

Hello all!

So I will keep this short and sweet, as I am in a huge time crunch to get my newer (used) 2005 Groovaru Outback H6 LL Bean off of life support in the garage and on the road. While I was swapping out my drive axles, I noticed this rather severe rust on the coolant lines that are mentioned in previous responses, both the long super bendy one that runs from the water pump area to the back of the engine, and the short one that runs from the water pump to the oil cooler. Decided that before I put my new pride and joy on the road, and since I have a few bucks to do it, I would just swap out any parts that looked too far gone to just spray with Fluid Film and hope for the best. So I've been racking my brain as to the possibility of any modifications that I might add to these pipes (coatings and such) that might help keep them rust-free longer. I will already be brushing/grinding/cleaning the entire underbody and soaking it down with Fluid Film, as I live in NE Connecticut where temps are almost always marginal during winter (always melting & refreezing) and they (CT DOT) just LOOOOOOVES spraying that liquid de-icer $h!t all over the roads, destroying EVERYTHING. My first Subaru (2001 Outback H6 LL Bean) recently met an untimely death recently due to this magnesium chloride nightmare.
I was thinking that instead of just spraying the new pipes with the truly AMAZING Fluid Film, that I would carefully wrap the exposed areas (those not inside a hose connection) with aluminum HVAC tape. I know that this stuff is really durable, and can withstand heat LIKE A BOSS, and am hoping that it would add an extra layer of protection to these pipes. Who knows, maybe the aluminum will also help them stay cooler and act as a sort of heat shield. Has anyone ever heard of someone doing this before? Is there any other sort of pipe wrapping tape that people have used with any success?
My thinking is that one of the reasons why the long pipe rusts so badly is because of poor heat shielding from the exhaust header. Any thoughts, suggestions, or comments would be greatly appreciated! Once I have some more time, I will definitely be posting pix and writing tutorials to help all of you Subaru lovers! :nerd:
 
#23 ·
Last August, on a 90 degree day one of those coolant pipes rusted out on my '08 H6, draining my entire coolant reservoir and overheating the car. They had to drop the subframe to get the pipe in there. I just had the car in for a new exhaust system last week, and they discovered that the other coolant pipe mentioned above is also on the verge of rusting out. I don't have the ability to do this myself so will have my mechanic do it. The car now has 150K miles on it. It has been costing me a lot over the past 2 years, with suspension parts giving out, etc. I calculated that I spent over $3000 on the car from 2018 until now. But heck I still love the car, and, engine wise it still runs well. Every issue that it has had are known issues with the H6 (tensioner pulley, oil cooler leak, coolant pipes rusting). But I also learned not to go with mevotech control arms. They wore out in 2 years. I had Moog front lower control arms put on instead. Now I just wonder how much rust on the rear subframe is too much and how to slow it down enough to get it at least to 200,000 mles. I think it will make it no problem, but I sure hope this is the last of the repairs for a long while. The latest issue is the airbag dash light coming on intermittently. Dealer stated it would cost over $350 to replace the airbag module. I know there are places you can send your module to have it inspected and repaired, but I'm not sure the car is safely driveable while you are waiting for the unit to be returned...
 
#27 ·
I could create a new thread but this is the original and so decided to add more info to it....

Thanks for the info provided I decided to tackle the job myself. I'm in the process of replacing the two pipes in a 2009 H6.
The large and short one in front of the engine parallel to the radiator is trivial to replace once the coolant is drained so I'm not going to write more about it.
The thin and long pipe is the hard one to replace ... if you do not know how. I hope that with the info below it will be easy for anyone to do it and save some money.

Note that I did not remove or disconnect the battery and that my engine bay is crowded as my car is fully loaded with options, I have additional harnesses installed for headlights and for hitch direct power from the battery. I also have a strut brace and the brake booster brace installed. None of the above were removed for this work.

Pipe Info
LH hard pipe diagram - Engine Coolant Pipe 14165AA021 (14165AA020) [14165] $62.73 (only $44 if you also need the rubber hose and clamps!)
Includes: 807615030 [H61503] & 2x 805922090 [F92209] a $18.33 value
Diagram from my dealer web site (they have good prices) WATER PUMP.. 2009 Subaru Outback 3.0L 5AT Limited | Eastside Subaru, Kirkland WA
Image


Prep work for removal:
  1. Lift the car or drive it with front wheels on ramps. No need to remove the wheels.
  2. Remove the under-engine plastic covers if you still have them.
  3. Drain the radiator by removing the radiator cap and opening the drain in the RH bottom corner. Collect the fluid for disposal.
  4. While the coolant drains you can proceed with other work. It drains slowly.
  5. Remove engine plastic cover
  6. Remove intake pipe and resonator to access upper transmission/engine stabilizer
  7. Remove the top nut and bolt of the upper transmission/engine stabilizer
  8. Move under the car
  9. Optional - for much easier access remove the exhaust headers. I usually remove the entire Y assembly including cats in one piece. Rusted nuts/bolts may break! Have spares on hand if you do not want to have a longer downtime.
  10. Remove the nut that holds the LH engine mount to the sub-frame. If exhaust is installed this is much harder to do but not impossible - make sure you do not round the nuts off! For some cars it may be necessary to remove the RH engine mount nut to as the mounts may be stuck to the sub-frame.
  11. Move on top of the engine and release the clip that holds the battery harness to the bracket on the suspension tower and lift the harness out of the bracket. This is to allow for more space to maneuver.
  12. Disconnect the vacuum hoses that go to the LH valve cover.
  13. Remove the bolts for LH injectors cover. Removing the cover is impossible at this time but it is not necessary.
  14. Move the injectors cover out of the way to gain more space at the back of the engine.
Pipe removal
  1. Assuming the radiator has drained, close the drain and move the container under the thermostat in the LH side.
  2. Under the car remove the short rubber hose from the thermostat housing to the thin coolant pipe. Fluid will drip!!!
  3. On top of the engine disconnect the thin coolant hose that goes from the throttle body to the end of the coolant pipe.
  4. Disconnect the cabin heater hoses - only one goes to the coolant pipe but removing the other one gives much easier access. Fluid will drip!!!
  5. Use a 12mm socket to remove the bolt holding the pipe at the back of the engine.
  6. Move under engine and remove the other bolt holding the pipe to the engine.
  7. Move the injectors cover back in its normal position.
  8. Use a jack and push the engine up - use a soft pad and push on the oil pan on the LH side! This will lift and tilt the engine a bit. You need a few inches of clearance between engine and sub-frame.
  9. Extracting the pipe out of the engine bay is done from the top between the engine LH valve cover and the frame.
  10. Stand on the LH side of the engine bay holding front end with left hand and rear end with the right hand.
  11. Lift the pipe, slide it back and then rotate it away from you (clockwise as viewed by the driver). Note the pipe position relative to the engine in the picture.
    Image


  12. Keeping the front end fix, move the tail up, and then rotate it towards you lifting the middle pipe elbow over the engine bay frame.
    Image


  13. Slide the pipe forward until the front bend passes the electrical ground bolt on the frame.
    Image


  14. Push the front end down and rotate the pipe away from you before lifting it so its under-engine mounting ear clears the ignition coils harness protector.
    Image


  15. Slide pipe forward first...
    Image


  16. ...then start lifting front end up while continuing sliding pipe forward.
    Image


  17. Work the front end over AC hose. You may disconnect positive battery harness for easier access (was not done in the picture).
    Image


  18. Pull the front end high for the tail to clear the cables and hoses and come out.
    Image


  19. Tilt the pipe away from you and slide the pipe forward, up and out.
    Image


#28 ·
Mine likely has the same rusty bulge per se as yours, just below #4 spark plug. It's big and nasty looking. I've sprayed mine with oil to keep it from progressing any further. It's only "on my list" of things to do. And when I fix it I'll be using a ratcheting tube cutter to cut that piece out and slip a piece of rubber coolant line on to replace the piece I removed, and clamp it at both ends.
That is a great idea! Working on trying to replace it on a 2012 Outback 3.6R, and I just lost a 3 hour battle to get it out. Not only does it require about a 1" engine/trans lift (not a big deal), but the bracket that mounts the juncture of the engine and trans to the bushing and crossbar is blocking the pipe (including split for the heater) from achieving the angle needed for removal. And removing that seems to be a bigger deal. I am wondering if it wouldn't make sense to just replace the whole thing with heater flex hoses. I will resort to that idea if I can't remove the bracket. I am thinking that to remove the bracket, I will have to give the engine/trans just enough lift to neutralize the strain on the bolts, because they seem pretty jammed, and difficult to access. Any input, tips or videos would be helpful.
 
#30 ·
I just completed the pipe replacement on my 2012 OB H6 3.6R. Space was obviously a little tighter, but it was very similar to the 3.0. However in lifting the engine from below, there is a significant size L shaped bracket that bolts to the side of the transmission with three 17mm bolts, one being next to the engine mount/bushing nut and is about 7" long. It should be the last bolt of the three as it has to be removed with the bracket because there is not enough space to remove the bolt otherwise. My bracket was a little stuck to the trans, so I lowered the engine with the bracket being back on the engine mount bolt, put the nut on to hold the bracket in place, and then lifted the engine again, and they came right apart. It added maybe only a hour to the job in labor, but took a few hours to figure it all out since there was nothing in the service manual or online. But it was rewarding to have the job done right, as I also thought about patching, or running the whole thing in heater flex hose.