This is a how to video, how to guide, and review for the LP Adventure canister filter bypass.
Video version:
Text version:
The purpose of the bypass is to avoid damaging the fuel canister when traversing deep water in a 2015-2019 Subaru Outback.
After reading multiple people having the same issue with water, it seemed like a worthy investment.
Usually people would drive through deep water or foods or even heavy puddles and the car would throw a P1449 error code. This should help fix it by bypassing the filter and saving the owner $1800+.
Tools needed:
Flat head screw driver, Phillips head screwdriver, 10mm socket and socket wrench. A clip removal tool would be nice but isn't necessary.
The install goes like this:
Jack the car up, take the driver rear wheel off, put it on jack stands.
Start removing the rear fender liner. It's held on entirely with rivet clips/pop rivets/automotive fasteners. To remove them just use a flat head screwdriver to pull the center pin out to release them then pull the entire thing out either with a flat head screwdriver. I have a removal tool that wraps around the entire collar and helps prevent damage to them.
I think you could likely do this without completely removing the fender liner and just bending it out of the way but I chose to completely remove it for the sake of the video. The goal is to get to the fuel canister located behind/above the fender liner.
With the liner out of the way, disconnect the line coming from the rear axle with the red clip. I had a little trouble with the clip as it kept wanting to snap itself back in place. Just took a few tries nothing too hard.
With the line disconnected, insert the plug and reinstall the clip thus locking it in place. Take the zip tie and tie the piece down so it's not rattling against things causing noise.
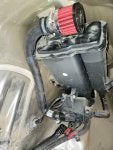
Take the bypass and install it where you just removed the breather line. It just installs using hose clamps.
Big note here: I had to disassemble the bypass completely and reverse the elbow that had been sealed as the wrong end was cut. It took me ten minutes to figure this out as I expected a part that was supposed to be bolt on to not require modification.
With the bypass now installed remove the 10mm nut towards the front, install the supplied clamp, and reinstall the nut to hold it in place.
You're done! Super easy.
Reinstall the fender using the clips, reinstall the wheel, get it off the jack stand and enjoy your new submarine.
Some final thoughts on the LP Adventure Canister Filter Bypass:
With shipping mine ended up being $66 delivered.
I have sourced some parts here:
K&N Filter
90 degree elbow (will have to be cut to fit)
3/4 Hose. It's actually too much but I couldn't find a smaller quantity.
Clamp (10 pack probably better to source locally as you only need one)
hose clamps (need 4 this includes 5)
I think the more handy types will be able to source everything but the K&N breather locally and for cheaper.
If you only buy the elbow, the filter, and the hose it's only $24 which is a third of their asking price.
All you need after that is clamps and that plug or really another way to seal that line up.
Video version:
Text version:
The purpose of the bypass is to avoid damaging the fuel canister when traversing deep water in a 2015-2019 Subaru Outback.
After reading multiple people having the same issue with water, it seemed like a worthy investment.
Usually people would drive through deep water or foods or even heavy puddles and the car would throw a P1449 error code. This should help fix it by bypassing the filter and saving the owner $1800+.
Tools needed:
Flat head screw driver, Phillips head screwdriver, 10mm socket and socket wrench. A clip removal tool would be nice but isn't necessary.
The install goes like this:
Jack the car up, take the driver rear wheel off, put it on jack stands.
Start removing the rear fender liner. It's held on entirely with rivet clips/pop rivets/automotive fasteners. To remove them just use a flat head screwdriver to pull the center pin out to release them then pull the entire thing out either with a flat head screwdriver. I have a removal tool that wraps around the entire collar and helps prevent damage to them.
I think you could likely do this without completely removing the fender liner and just bending it out of the way but I chose to completely remove it for the sake of the video. The goal is to get to the fuel canister located behind/above the fender liner.
With the liner out of the way, disconnect the line coming from the rear axle with the red clip. I had a little trouble with the clip as it kept wanting to snap itself back in place. Just took a few tries nothing too hard.
With the line disconnected, insert the plug and reinstall the clip thus locking it in place. Take the zip tie and tie the piece down so it's not rattling against things causing noise.
Take the bypass and install it where you just removed the breather line. It just installs using hose clamps.
Big note here: I had to disassemble the bypass completely and reverse the elbow that had been sealed as the wrong end was cut. It took me ten minutes to figure this out as I expected a part that was supposed to be bolt on to not require modification.
With the bypass now installed remove the 10mm nut towards the front, install the supplied clamp, and reinstall the nut to hold it in place.
You're done! Super easy.
Reinstall the fender using the clips, reinstall the wheel, get it off the jack stand and enjoy your new submarine.
Some final thoughts on the LP Adventure Canister Filter Bypass:
With shipping mine ended up being $66 delivered.
I have sourced some parts here:
K&N Filter
90 degree elbow (will have to be cut to fit)
3/4 Hose. It's actually too much but I couldn't find a smaller quantity.
Clamp (10 pack probably better to source locally as you only need one)
hose clamps (need 4 this includes 5)
I think the more handy types will be able to source everything but the K&N breather locally and for cheaper.
If you only buy the elbow, the filter, and the hose it's only $24 which is a third of their asking price.
All you need after that is clamps and that plug or really another way to seal that line up.
")