Subaru Outback Forums banner

How to separate a ball joint from the knuckle

48K views 19 replies 18 participants last post by  piste  
#1 ·
While under my car the other day I noticed my left front ball joint boot was torn, so I set about replacing it. This process is well documented so I won't spend too much time with the basics.

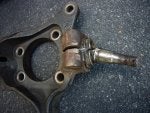
However, I had a serious issue getting the ball joint out of the knuckle. Separating it from the lower control arm was a pain, but once that was free I wasn't sure how to proceed. It was really stuck in the knuckle. I thought about the problem for a couple days and came up with the procedure below, which worked like a champ after a couple rounds of PB Blaster into the space where the impingement bolt goes.

Step 1: Jack up car, remove tire, remove ball joint impingement bolt. Leave the LCA bolted to the ball joint with the ball joint king nut in place.

Step 2: PB Blast the **** out of the ball joint. I did this twice on two separate days. I got a thin straw (came with a WD-40 can) and used that to direct the PBB into space left by the impingement bolt. This allows the PBB to creep around the puck section of the ball joint via the rounded out channel into which the impingement bolt fits.

Step 3: Use the floor jack as shown to raise the lower control arm until the axle is about horizontal. Insert a socket (I believe I started with a 3/8" drive 15mm) as shown. It won't fit until the suspension is loaded by the floor jack.

Step 4: Once the socket is in place, quickly release the floor jack. As the spring extends it forces the knuckle closer to the LCA, which wedges the socket between the LCA and knuckle. This will hopefully force the ball joint out of the knuckle a little bit.

Step 5: Repeat the process using progressively bigger (longer) sockets until the ball joint is free enough to tap out with a hammer.

Step 6: Remove the cotter pin and use an impact wrench to free the ball joint nut from the LCA. This is the only way I can think of to do this with the ball joint free to rotate. Once the nut is off you can pry the ball joint from the LCA. This step might go a lot easier if you break the joint while the ball joint is still in the knuckle, and then reseat/rebolt it for steps 3-5.

Image


Not a huge deal, but I hope it helps someone out of a similar jam.

Jim
 
#4 ·
Thank you!

I was just trying to pull the BJ from the knuckle to remove the axle to replace the inner CV boot. Needless to say, my Haynes manual says, the BJ should be able to be removed with ease by prying with a crowbar... No luck after a lot of time, PB and frustration. tried your method, within 30 minutes of jacking up and down and stepping up the sockets, had her out. did leave some minor indentations from the sockets in the control arm, but no biggy. thanks again!
 
#5 ·
While under my car the other day I noticed my left front ball joint boot was torn, so I set about replacing it. This process is well documented so I won't spend too much time with the basics.

However, I had a serious issue getting the ball joint out of the knuckle. Separating it from the lower control arm was a pain, but once that was free I wasn't sure how to proceed. It was really stuck in the knuckle. I thought about the problem for a couple days and came up with the procedure below, which worked like a champ after a couple rounds of PB Blaster into the space where the impingement bolt goes.

Step 1: Jack up car, remove tire, remove ball joint impingement bolt. Leave the LCA bolted to the ball joint with the ball joint king nut in place.

Step 2: PB Blast the **** out of the ball joint. I did this twice on two separate days. I got a thin straw (came with a WD-40 can) and used that to direct the PBB into space left by the impingement bolt. This allows the PBB to creep around the puck section of the ball joint via the rounded out channel into which the impingement bolt fits.

Step 3: Use the floor jack as shown to raise the lower control arm until the axle is about horizontal. Insert a socket (I believe I started with a 3/8" drive 15mm) as shown. It won't fit until the suspension is loaded by the floor jack.

Step 4: Once the socket is in place, quickly release the floor jack. As the spring extends it forces the knuckle closer to the LCA, which wedges the socket between the LCA and knuckle. This will hopefully force the ball joint out of the knuckle a little bit.

Step 5: Repeat the process using progressively bigger (longer) sockets until the ball joint is free enough to tap out with a hammer.

Step 6: Remove the cotter pin and use an impact wrench to free the ball joint nut from the LCA. This is the only way I can think of to do this with the ball joint free to rotate. Once the nut is off you can pry the ball joint from the LCA. This step might go a lot easier if you break the joint while the ball joint is still in the knuckle, and then reseat/rebolt it for steps 3-5.

Image


Not a huge deal, but I hope it helps someone out of a similar jam.

Jim
With the socket in place as shown in the pick. Which is a great idea, BTW. You/one could stick a "pickle fork" and the nut(might need a larger flange washer, don't know) and drive/pull BJ back the other way, before the taper seats, maybe taller socket too. Nice. Now I have a new one in the quiver.

BTW, unless I missed something, if all you need to do was pull the axle out of the hub, then separating the BJ at the control arm accomplishes that. It looks like you went the extra mile, albeit, unnecessary, and discovered something new.
 
#6 ·
FL cars sometimes come from up north, was this one?

the easier 1 minute approach is to remove the top strut mount bolt. loosen the lower one. one bolt, one minute, no rust, every time. mark the head of the upper bolt and reinstall the same orientation. never rusty...unless it's a parts car getting salt thrown on it.

In rust prone areas/vehicles it is ideal to not to pull the ball joint unless absolutely necessary. this one was obviously a bad one and good job getting at it, but they can be much worse still and that approach won't work.

the really bad ones require bashing the moving stud/ball out of the socket and then drilling the rest out. it's a bear of a job and i try to have extra extra hubs on hand just in case. granted, only part of the country needs to think about this and only a few out of every dozen are like that....but it's a debacle when it is.
 
#10 ·
WARNING: Some have reported that when spreading the knuckle too aggressively hammering a chisel into the slot, they have broken off an ear of the knuckle.

For those unfortunate souls where the above methods don't work, I humbly offer the following option that eventually worked so on a Pennsylvania car where the balls joints were securely rust-welded into the knuckle. Using a thin cutoff wheel inserted between the ears of the knuckle, cut a slot in the ball joint housing and the ball to give the metal a place to go. Then use a pointed chisel and a heavy hammer to work on the edge of the ball joint housing.
 

Attachments

#14 ·
Old thread, I know, but for those of us still hanging on to fairly old Legacy/Outbacks the OP's method is a timesaver!

I was in the process of swapping new control arms into my LGT (Outback is next couple of days, most likely.) and everything went reasonably well, until I was trying to free the balljoint from the knuckle. I had even been soaking everything down with actone/ATF and Free All for a couple days, but that thing was nicely rusted in to the point where my longest pry bar and biggest hammer weren't doing a thing.

At just before the point when I was about to start getting angry, (find my sledgehammer) and most likely break something, I decided to take a moment to cool off, and do a quick search here. Found this 'trapped socket' method, and figured what the hell.

10 minutes and a little more Free All later, I had the control arm out. Very happy at how easy that was, considering it's 16 year old car now. Guess Archimedes was on to something after all.
 
#18 ·
Thank you for this tip, @Sylverius. Your photo is no longer shown (at least for me), so here's another one showing a socket placed between the knuckle and the lower control arm.

I'd used a lot of PB Blaster, hammered away, and stripped out a ball joint separator before I tried this. Had to do it on both sides of our 2011 Outback.

Thanks again!

Image
 
#19 ·
Huh. I broke the bolt in the knuckle and just purchased a used one with the wheel bearing, Speed sensor ball joint complete years ago. I have since used the speed sensor, and wheel bearing from my old one. I have beaten the old hub and ball joint almost to a pulp so it seems and its still hanging on in the knuckle. Drilled out the old ball joint retaining bolt and extended the pinch slot furthur in even drilled a hole into the slot to pound at the backside of the joint. It really made be feel foolish as I let this one beat me. Good idea to slot the middle of the joint with a cut off wheel. I have a bunch of those. Some made a slide hammer arrangement yes and that socket wedge thing is great idea but OMG if it slips watch out! Thanks Lee_A for the pic BTW In the boston area and Full of salt roads. Some say subaru ball joints fail often. I still have one with 191000 miles on it.
 
#20 ·
So I was stuck with this while redoing suspension this past weekend. One side was fine but the other not so much. Took a LOT of heat and breaker bar to get the pinch bolt out to start with. Then I was at a total impasse after wedging between the pinch bolt gap, lots of hammer and chisel with no love. So then i reached for a very useful tool....the internet...and found this thread and tip. What a godsend. did as prescribed and each socket pulled it out just a touch more. Increased socket sizes until BANG. Only downside is "bang" included the strut spinning and axle popping out.

NOTE to mods...this tip should be in the hall of fame...or maybe a sticky. I can be a creative mechanic after 4 decades but would have NEVER thought to do this.